Building Self Documenting REST APIs with Django
In this article, we’ll learn how to build APIs for a library management system using the Django REST Framework and document the APIs with swagger

Adesegun Adebayo is a Senior Software Engineer based in Lagos, Nigeria. He loves exploring technologies and writing about stuff he does. When he’s not geeking around, he’s watching anime or catching up with his favourite manga.
This article focuses on how APIs are designed, structured and built using the Django framework while taking note of standard procedures required in a Django project. Here’s the GitHub link to the complete project which you’ll need to clone to your local system as we gradually work through the process of:
- Setting up a virtual environment and installing pip requirements.
- Creating models, migrations and applying the migrations.
- Adding endpoints for crud operations on books and catalogues.
- Configuring routes and URL accessibility.
- Documenting and testing the endpoints using swagger.
Note:
To make this article easy to follow through, please clone the complete project from the GitHub link and follow the Readme instructions to successfully complete the setup on your preferred IDE.
Getting Started
Taking a look at the requirements.txt file, we notice that the application uses the following packages :
Django: The official documentation site describes some of the framework’s design philosophies which includes loose coupling and tight cohesion, one of my favourite use cases of this feature is the ability to create a reusable utility layer that performs all sorts of validations (email, password, images, etc.). Django’s loose coupling structure allows one to easily reuse the same layer across several Django applications.
Django REST framework: The Django REST framework documentation describes the framework as a flexible toolkit for building APIs that align with REST best practices. In other words, it’s possible to build APIs without using a framework, however, Django-rest-framework is packed with a lot of features that make building APIs faster and easier, some of which are serializers, handling versions, requests and responses and it supports basic OAuth1a and OAuth2 authentication policies. Another thing you’ll find quite interesting is the many packages built around the Django rest framework, thereby extending its functionalities.
Drf-yasg: Documentation is an important aspect of building APIs, it helps bridge the communication gap that most times exists between the backend team and the team or individuals consuming these APIs. Yet another swagger generator(Yasg) is a package that builds on DRF, generating OpenAPI 2.0 specifications from DRF’’s APIs and therefore making the APIs self-documented, removing the need to create a separate documentation website for these APIs.
The requirements.txt file is usually located at the root directory of a Django project and it is important as it helps keep track of the packages used in the application and their specific versions at the time of development. This helps in ensuring that future changes that are not backwards compatible in the packages do not lead to future breaking changes in the application.
The requirements.txt can be generated using the following command on the project’s root directory:
Windows Users:
pip freeze -I > requirement.txt
Mac/Linux Users:
pip3 freeze -l > requirements.txt
Understanding the project structure
Creating a project in Django requires the following command:
django-admin startproject <ProjectName>
In our own case, you’ll have to replace the placeholder with “django_library_management” on the command line, the structure then looks like this after running the command successfully:
├── django_library_management
│   ├── django_library_management
│   │   ├── __init__.py
│   │   ├── __pycache__
│   │   ├── asgi.py
│   │   ├── settings.py
│   │   ├── urls.py
│   │   └── wsgi.py
│   ├── manage.py
Now, let’s take a brief look at some of the important files generated from the project creation command.
Settings.py: The Django documentation shows the different setups that can be done on the application’s core, although some of these settings already have default values.
Urls.py: The URL configuration file is where routes that link to views are listed. The URL documentation page also reiterates the flexibility that comes with designing URLs with no framework limitations. You can therefore design URLs to suit the REST architectural pattern or whatever standard that best suits your kind of project.
Manage.py: In simple terms, manage.py is the entry point of any Django application. It’s a command-line utility that allows you to interface with a Django project in numerous ways.
The Management Application
In this section, we’ll be looking at the core functionalities of the library management application and also taking a look at the command that creates a new application in Django.
Windows Users:
python manage.py startapp <appName>
Mac/Linux Users:
python3 manage.py startapp <appName>
Just as we did for the create-project command, you’ll have to replace the placeholder with “management” on the command line. Here’s what the structure looks like having added the management app:
├── django_library_management
│   ├── django_library_management
│   │   ├── __init__.py
│   │   ├── __pycache__
│   │   ├── asgi.py
│   │   ├── settings.py
│   │   ├── urls.py
│   │   └── wsgi.py
│   ├── manage.py
│   └── management
│       ├── __init__.py
│       ├── __pycache__
│       ├── admin.py
│       ├── apps.py
│       ├── models.py
│       └── views.py
When new apps are created in Django, you need to add them to the INSTALLED APPS array in the settings.py file. You’ll notice in the below code that Django also already adds some preinstalled packages to the project which are very much needed for the application to run properly, so it's advisable not to tamper with them.
INSTALLED_APPS = [
    'django.contrib.admin',
    'django.contrib.auth',
    'django.contrib.contenttypes',
    'django.contrib.sessions',
    'django.contrib.messages',
    'django.contrib.staticfiles',
    'management',
    'rest_framework',
]
Defining the Database Models
We’ll be adding the catalogue and book model to the model.py file. Books will exist in a catalogue, so the relationship will be a 1-to-many relationship as we can have more than one book in a catalogue and a book can exist in only one catalogue.
We need to import the models module first, our new models have to inherit from the models class of django.db.
from django.db import models
Let’s take a deeper look at the model definitions for the catalogue. The catalogue model has the following attributes; name, description and created. The attributes of a model represent database fields and “models.CharField” for example represents the field type, other examples of field types are Text, Integer, Varchar. When defining the field types for an attribute, we have the option of setting optional arguments that define the rules of these attributes. To illustrate this better, we break down the optional arguments that are set on the Catalogue model attributes.
null : This argument allows Django to store NULL values in the database if set as True.
blank : The argument allows a field to be blank if set as True.
max_length : This optional argument limits the number of characters that are allowed on a field. The name character only allows 100 characters, while the description allows up to 300 characters. If the number of characters supplied is beyond the max_length, the record will not save and an exception error will be returned. auto_now_add This argument brings in ease when it comes to setting the field to the current time the object is saved.
on_delete : This argument is useful in a many-to-one relationship between models, it requires two positional arguments which are the class to which the model is related and the on_delete option. In the code section that defines the Book model, we see that a relationship is defined to the Catalogue model and the on_delete is set to models.SET_NULL, this ensures that the deletion of a related catalogue doesn’t delete the associated book records, however, the column is set to null instead.
class Catalogue(models.Model):
    name = models.CharField(null=False, blank=False, max_length=100)
    description = models.CharField(null=True, blank=True, max_length=300)
    created = models.DateTimeField(auto_now_add=True)

    # Order the catalogue be name
    class Meta:
        ordering = ['name']
In the code above, we also see a class Meta that defines how a class behaves. In this case, the meta, in this case, describes the class has an ascending ordering by name.
Database Connection
Django officially ships with SQLite as its default database, it’s a popular and simple SQL database engine and quite easy to get the hang of. We’ll be using the existing database connection as defined in the code below.
DATABASES = {
    'default': {
        'ENGINE': 'django.db.backends.sqlite3',
        'NAME': BASE_DIR / 'db.sqlite3',
    }
}
You’ll also need to download DB Browser for SQLite. The tool enables us to view the SQLite database created.
Running the Migration
Having created the database models, we then need to convert these models to database tables. The following command is used for creating migration files from the command line:
Windows Users:
python manage.py makemigrations
Mac/Linux Users:
python3 manage.py makemigrations
This command is what creates the files in the migration folder, the file created is named 0001_initial.py and a quick look at the file shows a Migration class that inherits from the migrations module. The operations dictionary contains two CreateModel objects that describe the commands that will translate to the SQL queries, creating the tables on the database via the connection already set up in the settings.py file.
The step is to run the following command to apply your migrations:
Windows Users:
python manage.py migrate
Mac/Linux Users:
python3 manage.py migrate
What the above command does is typically check your database settings in setting.py and apply the migrations file to create tables in your database.
Let’s check the database using DB Browser for SQLite, open the DB Browser, Navigate to File > Open Database and locate the source directory of your project and then select db.sqlite3 to open the database
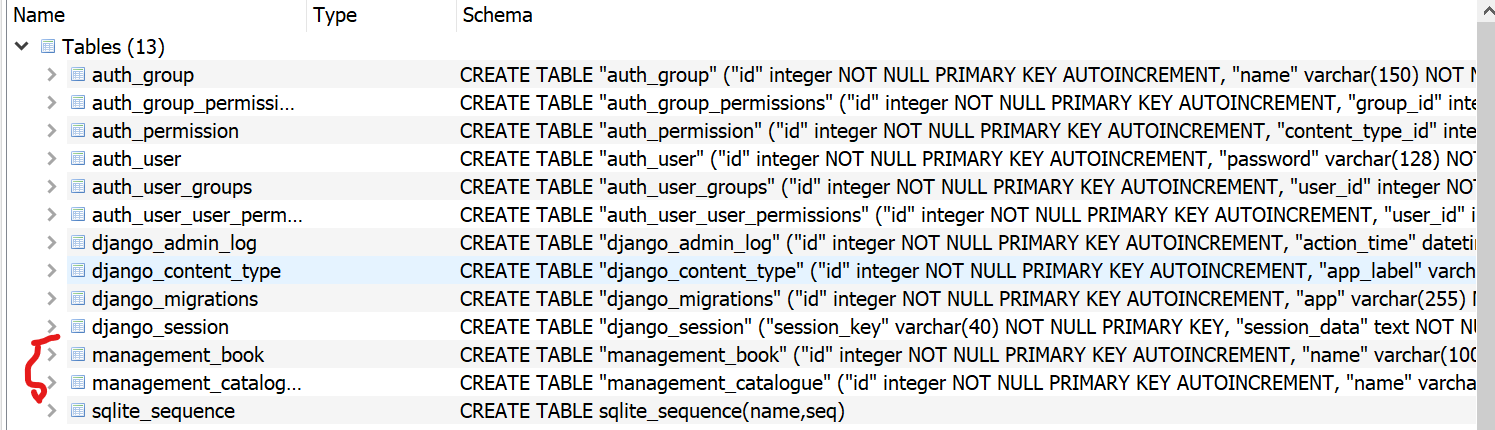
The above snapshot shows the migration was applied successfully. We’ve made some progress, now let’s demystify Django-rest-framework serializer.
Setting up the Serializers
The Django REST framework describes serializers as “Serializers allow complex data such as querysets and model instances to be converted to native Python datatypes that can then be easily rendered into JSON, XML or other content types. Serializers also provide deserialization, allowing parsed data to be converted back into complex types, after first validating the incoming data”.
In simple terms, serializers allow APIs to receive JSON/XML data, convert the JSON/XML data to our model types and also convert our defined model types to JSON/XML data. So we don’t have to write custom methods to do this.
We have defined serializers for both Catalogue and Book Models in the serializers.py file. Before adding the serializers, we also imported references to the Catalogue and Book models using the code below:
from .models import Catalogue, Book
Then, we import the serializers from rest_framework
from rest_framework import serializers
from rest_framework import fields
from rest_framework.fields import CreateOnlyDefault
In the code above, we also import the CreateOnlyDefault class that can be used to set a default argument during create operations and the fields class that serves as a base class for all fields, it simply helps us list the fields that we want to serialize and deserialize.
class CatalogueSerializer(serializers.ModelSerializer):

    class Meta:
        model = Catalogue
        fields = ['id', 'name', 'description', 'created']


    def create(self, validated_data):
        catalogue = Catalogue.objects.create(**validated_data)
        return catalogue
The above code describes a Catalogue serializer that inherits from the serializers.ModelSerializer class. Under the class Meta, we assign Catalogue to the model and define the fields that will be serialized and deserialized. You’ll see that the fields are the same as the fields that were defined in the database model. The create function as its name depicts takes in the validated data of the input fields and then calls the Catalogue model to save the validated data.
The BookSerializer pretty much does the same thing, the one thing you need to note is how foreign key relationships are represented in the serializer.
class BookSerializer(serializers.ModelSerializer):

    catalogue_id = serializers.PrimaryKeyRelatedField(queryset = Catalogue.objects.all())

    class Meta:
        model = Book
        fields = ['id', 'name', 'description', 'created','catalogue_id']

    def create(self, validated_data):
        book = Book.objects.create(**validated_data)
        return book
You’ll also notice that the catalogue_id is included in the expected fields for the serializer. Yes, we are done with defining the serializers. So what’s next? The views.py is where we would expose the serializers.
Time for your endpoints
We have defined the functions that handle POST, PUT, DELETE and GET requests for Catalogues and Books in the views.py file. The following imports have been added to the top of the views.py file.
from django.http.response import JsonResponse
from rest_framework.decorators import api_view
from .serializers import BookSerializer, CatalogueSerializer
from .models import Book, Catalogue
from rest_framework.parsers import JSONParser
from rest_framework import status
Looking at the above code, let’s get a bit of understanding of these imports. The “models import Book, Catalogue” references the models.py file where we already defined the models and just above it, we have the line that imports the serializers from serializers.py file, the “api_view” decorator is imported from rest_framework, decorators namespace. The decorator basically takes a list of HTTP methods that your view can respond to and by default allows only GET methods, so we have to specify other HTTP methods that are needed.
@api_view(['GET', 'POST', 'DELETE'])
The catalogue_list function takes in a request parameter and checks if the request sent is either an HTTP POST, GET or DELETE request. Let’s drive into each conditional statement that separates the logic based on the HTTP request type.
HTTP GET Request
The first condition checks for GET requests and if True, we first retrieve all existing catalogues:
catalogues = Catalogue.objects.all()
It then filters for requests that include a query parameter of “name”, and when a value is found in the query parameter name, it returns a list of catalogues that has similar names to the query parameter.
catalogue_name = request.GET.get('name', None)
        if catalogue_name is not None:
           catalogues = Catalogue.filter(name__icontains=catalogue_name)
The Catalogueserializer is then called to serialize the output to JSON and return the JSON output object to the requester. The CalatogueSerializer takes the list of retrieved catalogues ad optional parameter
catalogue_serializer = CatalogueSerializer(catalogues, many=True, context={'request': request})
        return JsonResponse(catalogue_serializer.data, safe=False)
HTTP POST REQUEST
elif request.method == 'POST':
        catalogue_data = JSONParser().parse(request)

        catalogue_serializer = CatalogueSerializer(data=catalogue_data, context={'request': request})

        if catalogue_serializer.is_valid():
            print(request.user)
            catalogue_serializer.create(catalogue_data)
            return JsonResponse(catalogue_serializer.data, status=status.HTTP_201_CREATED)
        return JsonResponse(catalogue_serializer.errors, status=status.HTTP_400_BAD_REQUEST)
The post condition for the catalogue_list function first parses the request body into catalogue_data and then the catalogue_data is passed into the CatalogueSerializer along with the context. We then check the validity of the context_serializer before calling the create function and return an HTTP_201_Created response on successful creation.
HTTP Delete Request
The delete condition calls the delete() function and returns the total number of Catalogues deleted and then returns a JsonResponse depicting the deletion message and the deleted objects count.
Note: You’ll notice that the book_list function shares the same structure as the catalogue_list function.
The next function we take a deep dive at is the book_detail function, this function finds and returns a book with respect to the supplied request. The @api_view decorator allows the GET, PUT and DELETE HTTP requests on this function.
book = Book.objects.get(pk=pk)
We first retrieve a book based on the supplied primary key (which can also be referred to as book_Id). You’ll notice that we use the “get()” method when retrieving a single detail and “filter()” method when retrieving a list of records. The get() method is faster when the use case requires that we retrieve a single record.
We then check the type of HTTP request made before serving a response. The check for the GET request passes the retrieved book object based on the supplied pk and then serializes the book object to book_serializer, the request is completed by sending the JSON Response of the serialized data.
 if request.method == 'GET':
            book_serializer = BookSerializer(book)
            return JsonResponse(book_serializer.data)
In the code below, we have the PUT HTTP method which signifies an update request being made. After parsing the request and validating the serialized data, we call the book_serializer method to save the changes and return an appropriate response.
elif request.method == 'PUT':
            book_data = JSONParser().parse(request)
            book_serializer = CatalogueSerializer(book, data=book_data)

            if book_serializer.is_valid():
                book_serializer.save()
                return JsonResponse(book_serializer.data)
            return JsonResponse(book_serializer.errors, status = status.HTTP_400_BAD_REQUEST)
Also note that the Catalogue_detail follows the same structure as the book_detail function, hence you’ll find it easy to figure things out based on the earlier explanations for the book_list function.
That sums up everything we need for the views. The next thing we need to do is create URLs for these views. The URLs will serve as a point of entry to our views. We need to create the urls.py file under the management app, this helps keep the URLs for each app within the app as you can create multiple applications in Django. It’s also possible to add all the URLs in the main projects’ urls.py file, however, I personally feel it’s cleaner to have the URLs for each app defined in the app and a reference is added to the project’s urls.py.
Here’s the code showing the URLs that point to the views we had just created in the management app.
#Define the URLs to views routing

urlpatterns = [
    #Define urls for Catalogue Operations
    url(r'^api/catalogues$', views.catalogue_list),
    url(r'^api/catalogues/(?P<pk>[0-9]+)$', views.catalogue_detail),

    #Define urls for Book Operations
    url(r'^api/books$', views.book_list),
    url(r'^api/books/(?P<pk>[0-9]+)$', views.book_detail)
]
The urlpatterns array is the standard for defining routes in Django, here you can see that the routes like “api/catalogues” points to the catalogue_list that was defined in the views.py file.
Documenting EndPoints using Swagger
We’ll be using the drf_yasg package for this purpose.
Install and Configure drf_yasg
You’ll typically run the following command to install dry_yasg.
Windows Users:
pip install drf_yasg
Mac/Linux Users:
pip3 install drf_yasg
The “drf_yasg” package has also been added to the installed app section in the settings.py file.
The main configuration for the package is done in the urls.py file of the main project. In the code segment below, you’ll notice that we added a schema definition
schema_view = get_schema_view(
   openapi.Info(
      title="Smashing Magazine Django Library Management API",
      default_version='v1',
      description="Let's smash the code!!!",
      terms_of_service="https://www.google.com/policies/terms/",
      contact=openapi.Contact(email="dadebayo.adesegun@gmail.com"),
      license=openapi.License(name="MIT License"),
   ),
   public=True,
   permission_classes=[permissions.AllowAny],
)
The yasg uses the OpenAPI definition and this allows us to add a custom title, API version, description and other details. The public parameter helps us set the visibility of endpoints accessible to the current user and the permission_classes allows us to set the API authentication to allow either authenticated or unauthenticated requests, the default value of permissions.AllowAny allows for unauthenticated requests.
The code segment defines the endpoint that allows us access to the generated API documentation, the drf_yasg gives us two options to either a swagger or redoc documentation. You can access it via “{BASE_URL}/swagger” or “{BASE_URL}/redoc”, the BASE_URL for your local environment in this case is “http://127.0.0.1:8000/”.
    url(r'^swagger(?P<format>\.json|\.yaml)$', schema_view.without_ui(cache_timeout=0), name='schema-json'),
    url(r'^swagger/$', schema_view.with_ui('swagger', cache_timeout=0), name='schema-swagger-ui'),
    url(r'^redoc/$', schema_view.with_ui('redoc', cache_timeout=0), name='schema-redoc'),
Sprinkle the decorators
We can now add decorators to the catalogue_list and other functions in the management app.
The catalogue_list allows a GET, POST and DELETE, we, therefore, need to add descriptions for all three requests. The code below adds the necessary import reference to the swagger_autp_schema.
from drf_yasg.utils import swagger_auto_schema
This has to be added the to the top of the catalogue_list function and right before the @api_view decorator
@swagger_auto_schema(method='get', operation_description="Describe get operation")
@swagger_auto_schema(method = 'post',operation_description="Describe post operation", request_body=CatalogueSerializer)
@swagger_auto_schema(method = 'delete',operation_description="Describe delete operation")
Add the following to the top of catalogue_detail just as you did for catalogue_list
@swagger_auto_schema(method ='get', operation_description="Describe get by Id operation")
@swagger_auto_schema(method = 'put',operation_description="Describe update by Id operation", request_body=CatalogueSerializer)
@swagger_auto_schema(method = 'delete',operation_description="Describe delete by Id operation")
Add the following to the top of book_list:
@swagger_auto_schema(method='get', operation_description="Describe get operation")
@swagger_auto_schema(method = 'post',operation_description="Describe post operation", request_body=BookSerializer)
@swagger_auto_schema(method = 'delete',operation_description="Describe delete operation")
Add the following to the top of book_detail:
@swagger_auto_schema(method ='get', operation_description="Describe get by Id operation")
@swagger_auto_schema(method = 'put',operation_description="Describe update by Id operation", request_body=BookSerializer)
@swagger_auto_schema(method = 'delete',operation_description="Describe delete by Id operation")
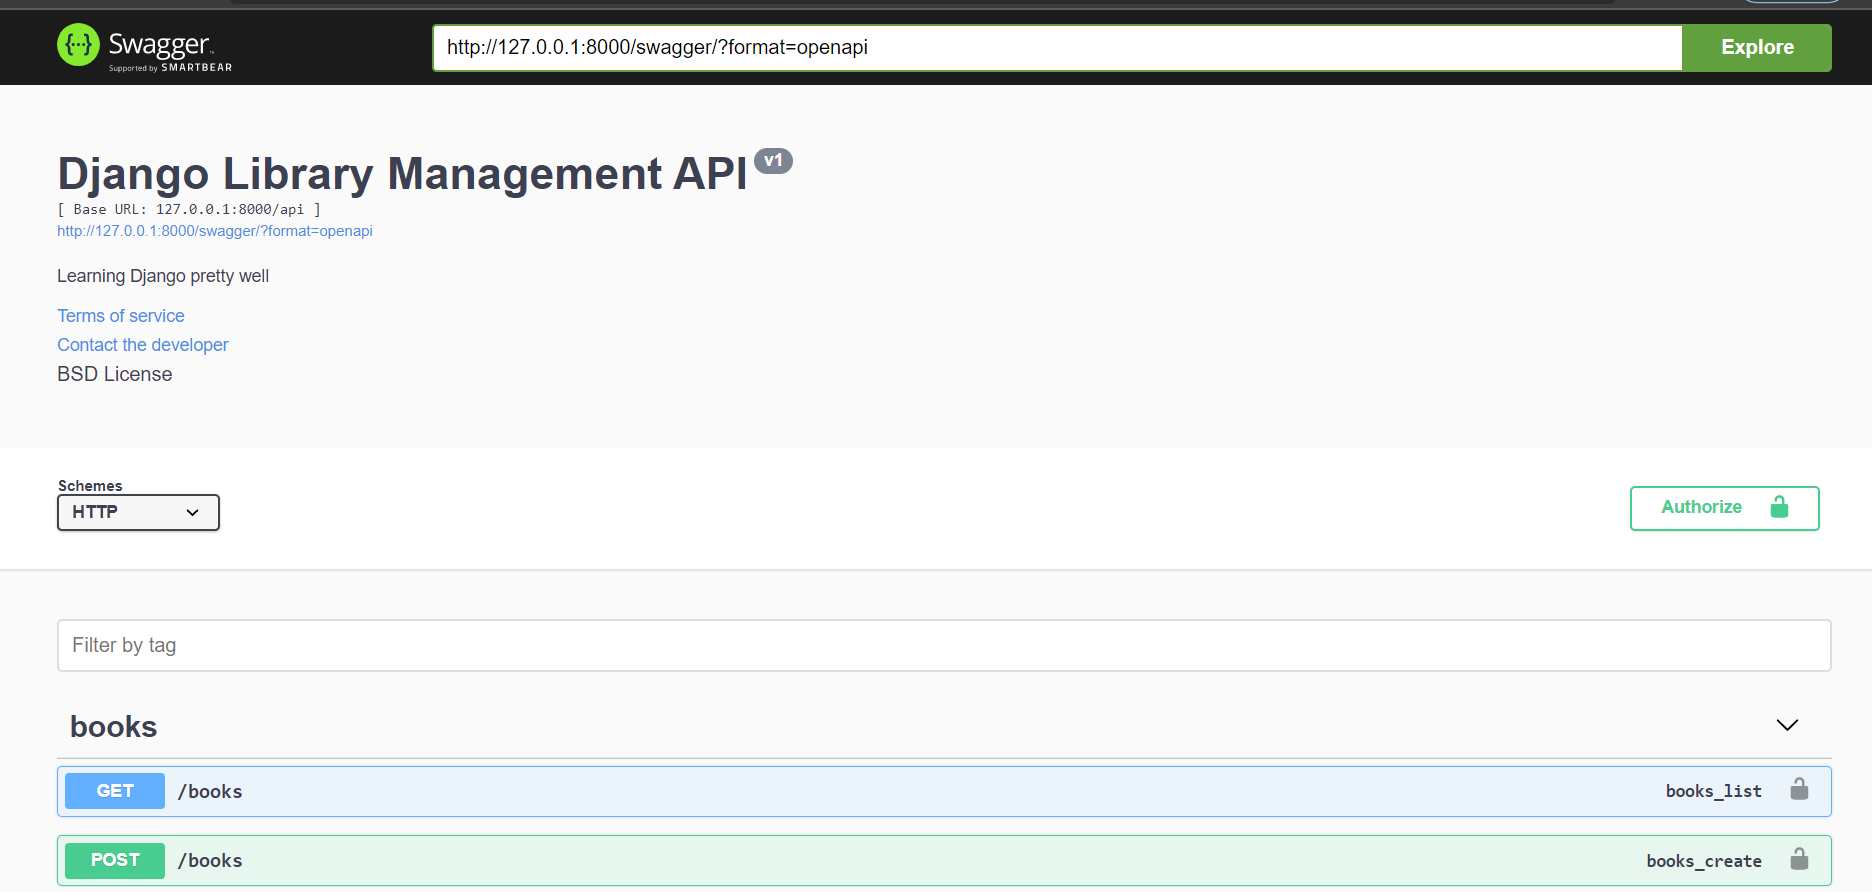
Run the application and navigate to “http://127.0.0.1/swagger/”, you should have the following on your screen.
Conclusion
In this article, we learned how to build a simple library management system with Django while also ensuring the APIs are self-documented. We also went through the process of creating our models, running migrations to an SQLite database and seeing how pretty much easy it is to document APIs using the drf_yasg package.

